
TL;DR
Moving your rig into a closet and using strategic placement plus targeted acoustic treatment can cut noise and reflections. This approach is often more effective and budget-friendly than relying solely on foam or panels.
Ever tried recording in a small closet and felt like you’re shouting into a tunnel? The truth is, the biggest noise reduction trick isn’t fancy foam or expensive panels. It’s the simple act of moving your rig away from your ears — into another room or a closet. When your noise source is distant, your workspace stays peaceful, no matter how loud the rig roars.
This article shows you how to make your tiny closet into a quiet, professional-quality space. We’ll cover placement secrets, the best materials, and the crucial difference between treating echoes and blocking sound transmission. If you’re tired of echo-y vocals or noisy background, read on. You’re about to learn how a few smart moves can turn your closet into a top-tier recording spot.
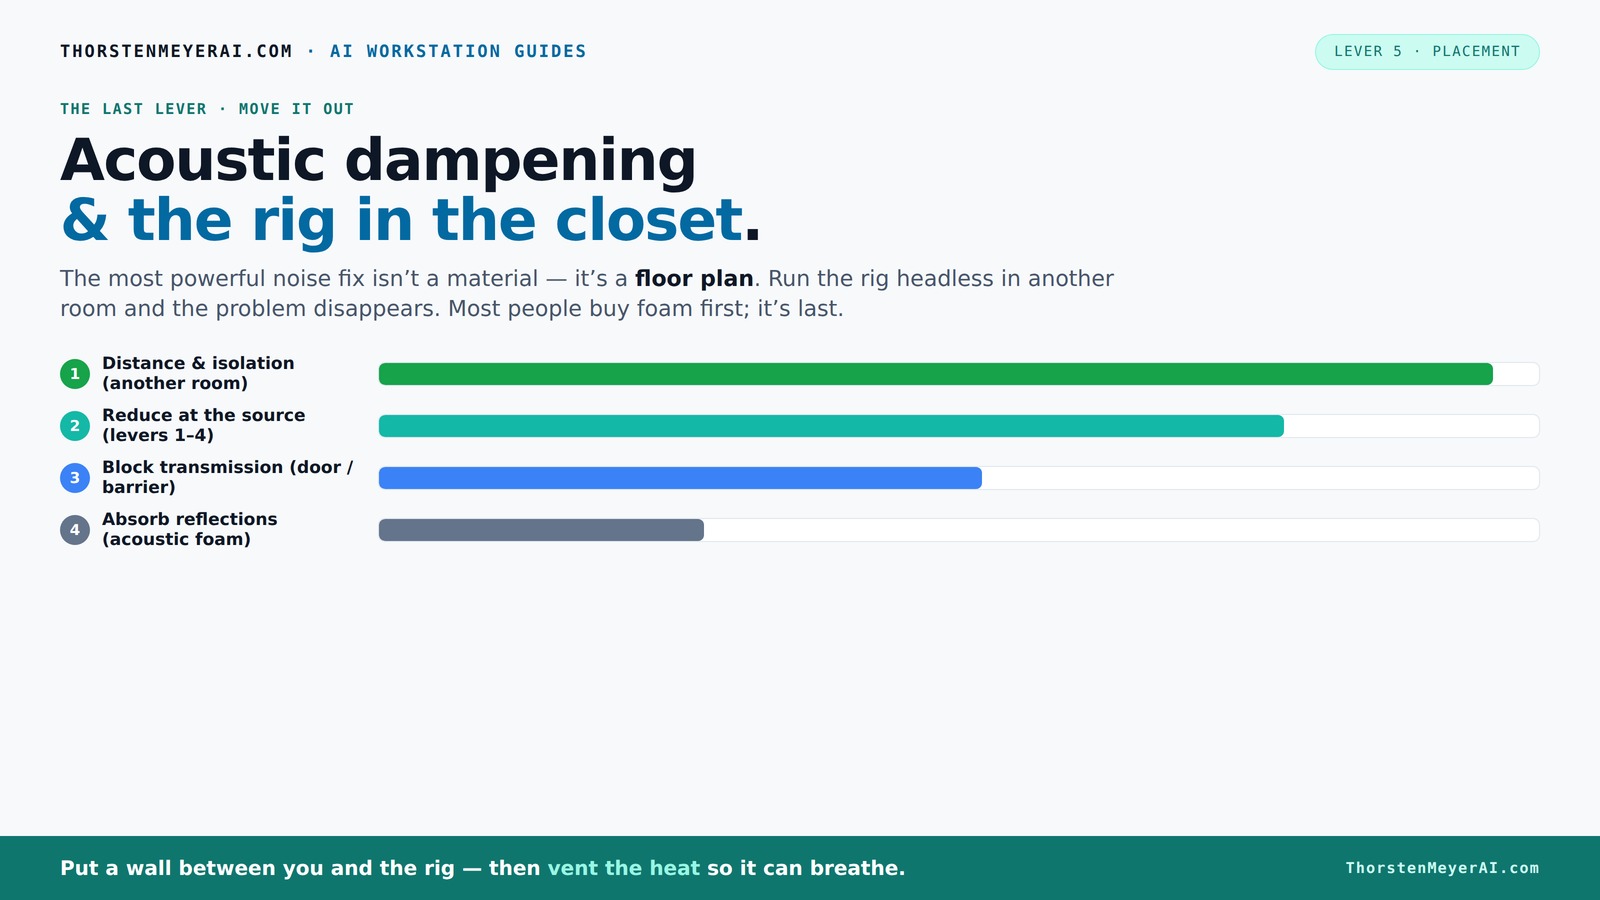
Acoustic dampening
& the rig in the closet.
The most powerful noise fix isn’t a material — it’s a floor plan. A rig you can’t hear because it’s in another room beats any amount of foam. Tap the approaches in Part 1 to see what actually works.
(another room)
(levers 1–4)
(door / barrier)
(acoustic foam)
Contain the noise, not the heat
Key Takeaways
- Moving your rig into another room or closet drastically reduces noise, often more than foam treatments.
- Proper ventilation in a closet setup prevents heat buildup that can damage hardware and cause loud fan noise.
- Target reflection points—walls behind the mic, ceiling, side walls—for maximum acoustic improvement in small spaces.
- Sealing gaps around doors and panels is a low-cost, high-impact way to improve isolation.
- Bass traps in corners prevent low-frequency muddiness and make your recordings clearer.
Evovoce 12 Pack Acoustic Panels, 12"x12"x2" High Density Sound Absorbing Wedgefoam soundproofing, Fire Resistant Soundproofing Panels for Home Studio, Office, Recording Room Walls
- High-Density Noise Reduction Foam: Reduces echo and reverberation
- Optimized Acoustic Performance: Absorbs mid-to-high frequency noise
- Soft, Safe Foam Padding: Comfortable and kid-friendly
As an affiliate, we earn on qualifying purchases.
As an affiliate, we earn on qualifying purchases.
Why Moving Your Rig Is the Most Powerful Noise Hack
When your rig sits right next to you, it’s impossible to ignore its hum, whine, and fan noise. But if you put it in another room or a closet, the noise drops drastically. Think of it like a loud dog — if you shut it in another room, the sound doesn’t bother you anymore.
For example, a typical GPU rig with 600W of heat output can be heard from across the house when sitting on your desk. But if you move it into a closet with a proper vent, the noise becomes almost invisible — even in a quiet room. This simple shift can cut your noise level by 70% or more, making your workspace silent while the machine works at full tilt.
This approach is especially perfect if you’re working remotely, streaming, or recording vocals. Your machine can roar in peace, while you stay focused on your voice, not the fan noise.
The "Rig in the Closet" Setup — How to Do It Right
Placing your rig inside a closet can be a game-changer—but only if you handle airflow and heat. A sealed closet traps heat like a pressure cooker, which can fry your components over time. The trick is to give it a way to breathe.
Start by installing passive vents or a quiet exhaust fan. These keep the hot air moving out and cool air flowing in. For example, a small, low-noise exhaust fan can keep the temperature stable, preventing throttling and loud fan noise. Some creators even build custom soundproof cabinets with ducted airflow and thermostatic control, blending silence with cooling. For more on this, see this guide on temperature-controlled enclosures.
If you’re interested in a more engineered solution, check out this guide on temperature-controlled enclosures. Remember: you can’t just shove a hot machine into a box and hope for the best. Proper ventilation is a must.
Where to Focus Your Acoustic Treatment First in a Tiny Closet
In a small space, treating the first reflection points makes a huge difference because these are the surfaces where sound bounces immediately after leaving your microphone or speaker. If these reflections aren’t controlled, they can cause comb filtering, echo, and a boxy sound that muddles your recordings. By understanding and addressing these reflection points, you can significantly improve clarity. For more detailed tips, see this article on acoustic treatment.
For example, placing acoustic panels directly behind the microphone and on the ceiling intercepts the initial sound waves bouncing from hard surfaces, preventing them from reaching your ears or your recording device. Covering about 60-80% of these reflection surfaces with foam, blankets, or panels reduces flutter echoes and creates a more balanced sound. This isn’t just about absorbing sound; it’s about shaping the acoustic environment so your recordings are clearer and more natural.
In extremely tight spaces, corners tend to accumulate low frequencies, creating muddy recordings. Filling these with bass traps or thick panels helps tame these problematic frequencies. Think of the corner as a magnet for bass — filling it with dense material allows excess low-end energy to dissipate, resulting in a more accurate representation of your sound.
Foam, Blankets, or Panels? What Works Best for Your Closet
Choosing the right material depends on your goals. Foam panels are easy and affordable but mainly reduce echo and flutter. Blankets and moving pads are flexible, cover large areas, and are great for DIY setups. Acoustic panels are more efficient but pricier. For more on effective acoustic treatment options, visit this guide on acoustic treatment materials.
For example, a creator might hang moving blankets on the door and walls, then put foam panels above the mic. This combo reduces both reflections and some noise leakage. Bass traps, thick panels in corners, help control low frequencies that make your sound muddy.
If you’re on a budget, start with blankets and foam. If you want cleaner, more professional sound, invest in custom panels and bass traps. For detailed comparisons, see this guide on acoustic treatment materials. Remember, the effectiveness of each material depends on proper placement and coverage, and sometimes a combination of materials yields the best results.
Sealing Gaps and Doors — The Hidden Weak Point
Gaps, cracks, and unsealed doors are the biggest leaks of sound and heat. A tiny crack around the door frame can let in or out a surprising amount of noise. Sealing these with weatherstripping or acoustic sealant is a simple yet highly effective way to enhance isolation. For more tips on sealing your space, see this article on acoustic dampening.
For example, sealing a closet door with weatherstripping and a door sweep can reduce noise bleed by up to 50%. This not only improves sound isolation but also helps maintain a stable internal environment, reducing temperature fluctuations that could affect your hardware. Proper sealing prevents external noise from infiltrating your space and internal noise from escaping, which is crucial if you’re recording in a noisy environment or sharing space with others.
Remember, the quality of your seal impacts how well your treatment works. Small investments in sealing materials can lead to significant improvements in your soundproofing and thermal management.
Bass Buildup and Low-End Woes in Small Spaces
Small closets often develop a bassy, boomy sound because low frequencies bounce and amplify in tight corners, creating a muddy or boomy mix. This phenomenon, known as bass buildup, occurs because low frequencies tend to reflect and resonate within small, enclosed spaces, leading to uneven sound reproduction. To counteract this, consider adding bass traps or acoustic panels in the corners. For more on managing low-end issues, see this guide on acoustic treatment.t this, adding bass traps or thick acoustic panels in the corners and along wall-floor junctions provides a dedicated space for these low frequencies to dissipate, resulting in a clearer, more balanced sound.
For example, a YouTuber installed DIY bass traps made from mineral wool in the closet corners. This significantly reduced muddiness, allowing vocals and instruments to sit more naturally in the mix. The key tradeoff is that bass traps can be expensive if bought commercially, but DIY solutions using dense insulation or rockwool are cost-effective and highly effective. Addressing low-frequency issues is essential because they often cause recordings to sound muffled or boomy, especially in small, untreated spaces.
Avoiding Common Mistakes That Ruin Your Closet Sound
Many creators make the mistake of over-treating or misplacing their panels, which can deaden the room too much or create uneven sound. Over-absorbing can lead to a dead, unnatural sound that lacks liveliness, while misplacing panels away from reflection points diminishes their effectiveness. It’s essential to target only the primary reflection points—these are the surfaces where sound bounces immediately after leaving your mic or speaker. Treating these areas maximizes the benefit of your acoustic panels without overdoing it.
Another common mistake is neglecting ventilation. A sealed closet without airflow can overheat, causing throttling fans, shutdowns, or hardware damage. Proper ventilation not only prevents heat buildup but also ensures that your acoustic treatment remains effective over time. Incorporate ventilation strategies early, such as vents or ducted fans, so that noise from cooling systems doesn’t compromise your sound quality.
For example, one DIYer treated all walls with foam but overlooked the ceiling and door gaps, resulting in persistent echo and noise leaks. Targeted treatment combined with proper sealing and ventilation creates a balanced environment that’s quiet, clear, and safe for your equipment.
Budget vs. Pro-Level Closet Booths — What’s Enough?
For casual creators, a few blankets and some foam panels can make a noticeable difference by reducing reflections and flutter echo. These DIY solutions are quick, affordable, and effective for small-scale projects. However, if you’re aiming for professional-quality recordings, investing in custom acoustic panels, bass traps, and ducted ventilation systems becomes worthwhile. The key is to balance your budget with your desired sound quality.
For example, a hobbyist might hang blankets on the walls and use a small fan for ventilation, achieving decent results without breaking the bank. Meanwhile, a serious streamer or podcaster might opt to build a custom, sealed enclosure with high-quality panels, controlled airflow, and dedicated acoustic treatment. Remember, in small spaces, coverage and placement often outweigh the specific materials used. Smart, targeted treatment can outperform expensive but poorly placed materials.
Ultimately, the goal is to create a well-balanced environment that minimizes noise and unwanted reflections while remaining within your budget. Quality over quantity and strategic placement are your best tools.
Frequently Asked Questions
Do I need foam, panels, blankets, or bass traps?
Start with blankets and foam to reduce reflections and flutter echo. Add bass traps if low-end buildup is a problem. For professional results, invest in acoustic panels and bass traps.Where should I put treatment in a closet booth first?
Begin with the reflection points: behind the mic, ceiling, and side walls near the source. Covering 60-80% of these surfaces yields the best results.How much coverage is enough?
Aim for at least 60% of the walls and ceiling covered with foam or blankets. Focus on reflection points first, then treat corners for bass issues.Should I treat the walls, ceiling, door, or floor first?
Prioritize the reflection points and door gaps. Treat the ceiling if it’s reflective, and add bass traps in corners for low frequencies.How do I stop echo without making the closet sound dead?
Target only the primary reflection points. Over-treating can deaden the space too much. Use a mix of absorption and diffusion for a natural sound.Conclusion
Turning a closet into a quiet, effective recording space is all about smart placement and ventilation. When you treat the right spots and keep your rig cool, you gain professional sound quality without breaking the bank.
Remember: the best noise control isn’t just about absorbing sound — it’s about creating distance, sealing leaks, and managing heat. Your closet can become your secret weapon for studio-quality recordings, if you use these simple but powerful tricks.